
Wednesday's Children Are Stitched Up


Neglecting my blog in the last month was one of the sacrifices I made for Wednesday's Children. Just a recap since it's been such a long time since I mentioned them.  Here is my submission for the exhibition "Stitched Up" - bringing to life the girls who were  placed in care at the Newcastle Industrial School 1867-71. I have now created 193 art dolls, made from sticks and strips of cloth.

Wednesday’s child is full of woe (from a nursery rhyme c.1838)
The stories of each of the girls in the Newcastle Industrial School and Reformatory   have been r researched by local historian, Jane Ison. Each story captured my heart.... 
Stick dolls seemed an appropriate way for me to honour the life of each of these girls and to compensate for lost childhoods.  I like to think if they had the opportunity they might have made little dolls from found materials - sticks and scraps of fabric, just as I enjoy making them 150 years later. These dolls are artistic representations and are not intended to be 
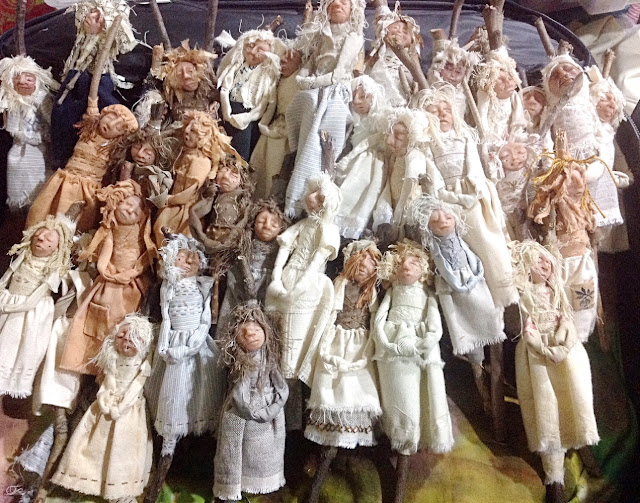
accurate or lifelike depictions of the girls.  In the installation, there are 193 stick “figures” wrapped in layers of cloth and individually stitched and sculpted Their different sizes and shapes draw attention to their individuality. Some have their hands ‘tied’ (knotted cloth), others have their arms raised in defiance (natural fork in a branch)  or hanging loosely in quiet resignation. (thin branches).The  polymer clay faces are individually sculpted to convey some of the sadness and misfortune  of the girls’ lives.

 In a previous post, I said  that this post would focus on how  the arms are made, so if you have been following the posts in this series, you have a set of mini-tutorials so you can create your own stick doll. 
1. The easiest way to improvise arms on a stick doll is to choose a suitable branch. In the group I made, I wanted to portray the defiant behaviour of some of the girls... The natural fork of a branch  to me was the shape of  arms held up in protest  by the escapees from the institution.

2. The next easy way is to choose two small twigs and wrap them in cloth, and stitch them into place . These straight stick arms I think suited the girls who were compliant or had  learnt to tolerate their fate.


3. For many of the dolls in this installation, I wanted to show that these girls were not only 'stitched up' but  were defenceless and unprotected  - their 'hands were tied'.... hence the arms and hands are strips of  knotted cloth. I also improvised a sleeve from the same piece of fabric. 
Step 1. Iron a strip of fabric - approx 10cm/4 inches longer than the total length of arms for the doll. As I made 193 of these dolls by hand , I did not stitch this strip, but of course, you could fold the fabric right sides together lengthwise and stitch by machine and turn the strip out to the right side. 

 Step 2 ; Tie a know in the middle of the strip - these are the improvised hands.
 Step 3. Stitch at the top of the arm and secure, and then turn the remaining fabric inside out
 Stitch on the top of the arm line to the body of the doll.
Step 4. Turn  the end of the strip  towards the bottom of the arm, so that it creates a sleeve and sew an inside seam. 

Step 5: Secure the arm and sleeve to the body  of the doll by ladder stitching or slip stitching around the top of the sleeve and taking a stitch right through the sleeve and the body to hold in place

Hope you have enjoyed this series of mini tutorials and you will try to create a stick doll of your own. 


'STITCHED UP' Exhibition  opens at "The Lock Up' in partnership with Timeless Textiles Gallery - 90 Hunter Street, Newcastle NSW Australia.  on 23 June,  6pm , until 6 August. 
Featuring 24  international and national artists 
Co-curatedby Anne Kempton and Wilma Simmons 


Comments

  1. I saw these at Timeless textiles all set up and they we’re memorising. I took my time as I walked around investigating every detail. Thank you for sharing more details about them.

    ReplyDelete
  2. I am across your sculptures on Pinterest. They immediately arrested my attention and moved me deeply. For the pain and suffering of one sister in particular. My heart is breaking.

    ReplyDelete

Post a Comment

Thanks for reading my blog and please share your thoughts about my blog post by leaving a comment.Your comment won't appear immediately as comments are verified before publication in an effort to reduce the amount of spam appearing. Anonymous comments will not be published.

Popular posts from this blog

A November project

 A few years ago, I began scheduling into my day, the routine of a daily art practice.... seven years later, I still love #the100dayproject and am a strong advocate of "create something, anything, every day" .  In more recent years, I haven't been content with a mere 100 days and have often pursued shorter /or longer projects requiring some daily attention. For example, I completed 145 days of slow stitching my garden and then another 60 day random cross stitch garden.... but that's a digression....  This month, I am being far more practical... I still like to send and give Christmas cards, but am always getting them in the post very late, and trying to make some  special unique cards  for the family the night before.... so all this month, I am making Christmas cards - just one a day. By 30 November, I should have some to choose from for posting within Australia and for giving in December.  Here are my first 4 days ....  If you're wondering why bother ...

Fish and Sticks : Art Dolls

This week I've been working on fish and sticks ....  The sticks are the message stick art dolls which were very popular, attracting some attention and a few orders at the Wise Women exhibition. Each of the message stick dolls are from the Wise Women series, each with her own personality and  message of wisdom, handwritten on a handmade timber tag. I gather the sticks during my walks around my neighbourhood and the tags are made from special bits of timber, some collected by me or  my husband or from off cuts gifted to us  from another doll making friend whose husband makes bagpipes. These dolls start off very simply with a wrap around a stick, in the general shape of a body. 'Naked" message stick dolls - strips of wadding wrapped around found sticks.   Then I usually wrap other layers of fabric, wool, and/or fibres, over which I do some simple embroidery. I sculpt  or mould small face masks for these dolls. I really like using "sari ribbon" as w...

How does your garden grow with stitch?

"How does your garden grow with stitch?" is an update on a post I published way back in 2015, when I stitched my first "impressionist garden" for a course I was studying at the Embroiderers' Guild.  Gardens are my constant inspiration for my artwork, and I create gardens in cloth  and stitch repetitively, using many different techniques. I am particularly fond of this heavily stitched embroidered "impressionist" garden.  In 2016, I stitched two small gardens in this style for an exhibition and they included photos of  my husband's grandmother and her brother and sister as children. Although the collector who bought these two works did not know our family, the children reminded him of his own family from England of about the same era. These two 'gardens'   have become my "stitch" reference and images which best showcase the technique although I don't have the originals any more.   Since then,  quite a few other gardens have gro...