
Seasons Challenge

To herald the beginning of Winter, the weather has been cold, rainy and stormy this week, so like most people who live in Newcastle ( NSW, Australia), I have been thinking of that memorable June weekend in 2007, now known as the Pasha Bulker weekend when this huge ship ran aground on the beach during a winter storm ... but I have bigger challenges related to Seasons to contend with.
My doll makers' group, Hello Dollies, has a challenge to create a cloth doll, using the theme " Seasons" as inspiration and with only one rule that the fabric used must be of our own creation. As usual, I have left it to the last few weeks and although I have been thinking about the project for months, it is only in the last week or so that I have been propelled into action. I chose the stump doll pattern from the choice of two patterns provided.
Idea No.1 was to paint fabric and then machine embroider it and use it as the body for the doll and I was going to use the tree template to create the four seasons of an apple tree - spring flowers, summer fruit, autumn leaves and winter branches. Idea No. 2 was to develop the idea of a series of dolls, somehow using the tree concept as well. It is still an idea but it all seems too difficult now with so little time left.
Idea No. 3 was to create fabric with my embellisher machine. Great idea - quick and easy! Using fabric previously made as a sample, I made different textured pieces of fabric in what I thought were seasonal colours. How wrong can a simple task turn out? Spring somehow looked far more like "water", Autumn and Summer were just too dark and somehow looked "tribal". So another distraction or procrastination? I was diverted from the main task, and this week, I felt compelled to use the fabric I made and rejected for the Seasons project into little wearable art pouches. I'm happy with these, but not with the prospect of making more "seasonal" fabric.


The project plan today ( is this Idea No. 4?)  is to make four flat dolls each representing a season, using machine embellished and surface embroidered  fabric. Each of the flat dolls will be displayed as if they are emerging from an archway or doorway. Arches/doors 1 and 2 and 2 and 3 will be connected by a flat fabric tree and hopefully, the whole project will be free standing depicting the transition of the seasons.
If you feel like making a comment, I would love to know what you think of this idea - will it work? any tips for construction? any better ideas? what colours do you think of for each season?

Comments

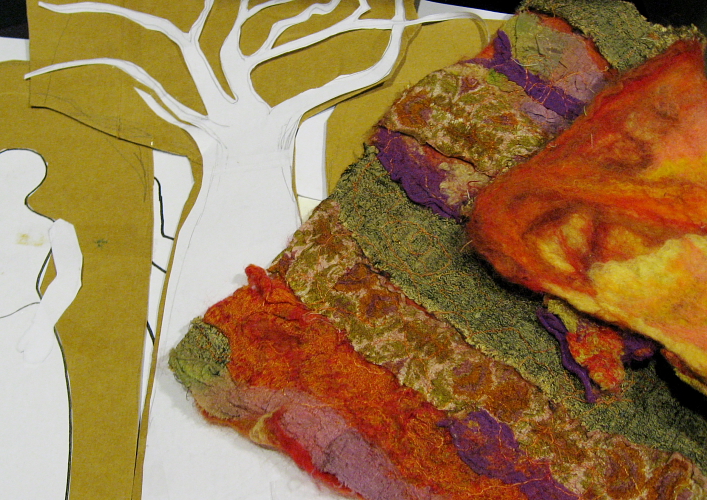
  1. I think that sounds beautiful! I can't wait to see how it turns out!

    ReplyDelete
  2. What a fantastic idea.LOVE those fabrics..and the pouches you made from them. Yes the dolls emerging..ooh so exciting!!

    ReplyDelete
  3. I am just too too excited to find your blog. Wonderful art. I am going to really enjoy the things you make.

    ReplyDelete

Post a Comment

Thanks for reading my blog and please share your thoughts about my blog post by leaving a comment.Your comment won't appear immediately as comments are verified before publication in an effort to reduce the amount of spam appearing. Anonymous comments will not be published.

Popular posts from this blog

May I Present Mrs Chalumeau...

Finally Mrs Chalumeau takes a bow …She is a Pearly Queen … 695 buttons on the doll and 10 on the journal.(I think – could be more). I would like to thank Paula from Antiques and Collectables here in Hamilton, Newcastle and Raku Buttons ETSY seller for supplying me with about 500 of the vintage mother of pearl buttons, and the rest I had in my stash. I think they look great on my pearly queen, but I am truly tired of sewing on buttons. It made me think however, how many buttons must be on the elaborate clothes of the real pearly Kings and Queens! I drew my inspiration from the lovely lady pictured here, and the following description from Wikipedia. ... A Pearly King ( feminine form Pearly Queen) is a person dressed in a traditional Cockney costume covered in mother-of-pearl buttons. These costumes were treasured heirlooms, hand made and sometimes representing much of a family's wealth. .... This doll is all cloth – a little different from most of my other dolls which generally h

Wednesday's Child /2

Work in Progress - 3 of the 193 for "Stitched Up"- Wilma Simmons   The work for the "Stitched Up " Project  continues. See the previous "Wednesday Child" post for the background to this art project celebrating the 150th anniversary of the Newcastle Industrial School. I have been documenting the progress of my work, so I thought it might be interesting to share some of the early stages of the "stick dolls" ... Here are some of the beginning steps.. Sticks collected while walking the bushland in my neighbourhood  Drying and getting rid of any insects - oven heat 75 degreesC for approx 1-2 hours.  Trimmed and cut if necessary  Ends sealed with matte sealing solution.  Drying  - solution goes on white but dries clear.  First wrapping - foil to create a body shape  Second wrapping - stretch fabric.  Third wrapping - fabric strips  Some stitching - more stitching and embellishment to come.  Follow thi

"Temari Or Not Temari?" Tutorial

 Background Information:  Temari (literally translated “hand ball”) is a Japanese folk craft that is alleged to have originated in China and was introduced to Japan five or six hundred years ago. Traditionally, the balls were constructed from wrapped kimono fabric remnants and silk threads. They were made by mothers and grandmothers for children to play with. Nowadays, decorative embroidered temari represent a highly valued and cherished gift symbolizing friendship and loyalty. Recently I've wondered if your don't use traditional techniques whether you should call what you create "temari". That is an ongoing debate but today I share what I do to make a "non-traditional temari".... 1.I start  with a polystrene ball ( traditionally the balls were wound  silk scraps or other organic materials) and begin to wrap with approx 4 ply wool, turning the ball as I wrap.  2. I then wrap another layer of wool in a similar fashion , this time a 3 or 2